Sunday, April 17, 2011

Easy Puff Pastry Tart

This tart is based on the free-form French pie technique known as "galette." Normally a galette is made with pate brisee, which is a standard pie crust. I use a sheet of store-bought puff pastry rolled out to the size of a baking sheet. It's incredibly easy to do and creates an impressive presentation that will wow your guests -- and you! I am sharing the recipe for an apple-blueberry tart flavored with cinnamon sugar. The opposite flavor profile, but equally delicious, would include dijon mustard, sliced turkey or ham, and a sprinkling of excellent gruyere cheese. Any and everything in between would be delicious.


Puff Pastry Tart
Serves 6
Prep Time: 10 minutes
Cook Time: 20 minutes
  • 1 sheet store bought puff pastry, rolled roughly to the size of a baking sheet
  • 2 granny smith apples, peeled, cored, and thinly sliced
  • 1/2 cup fresh blueberries, raspberries, or blackberries
  • 2 tbsp. white sugar
  • 1 tsp ground cinnamon
Pre-heat your oven to 425 degrees. Roll your puff pastry to roughly the size of your baking pan on a large sheet of parchment paper. Leaving a 1-inch border, arrange the apples neatly on the dough. Sprinkle over the berries. Dust with the cinnamon sugar.
Bake for 20 minutes or until the pastry is risen and the apples are soft. Allow to rest for 10 minutes, slice, and serve.

Friday, April 15, 2011

Tiny Cream Biscuits

There is a traditional recipe for cream biscuits, but I find that a whole biscuit is too much for a guest as a side bread at supper. Here, you can use a shot glass as your biscuit cutter and serve these small puffs of fatty pastry with accoutrements to your heart's content.

Tiny Cream Biscuits
Yield: About 20 biscuits
Prep Time: 5 minutes
Cook Time: 15 minutes
  • 1/2 stick unsalted butter, chilled and cubed
  • 2 tbsp. chilled vegetable shortening (recommended: Crisco baking sticks)
  • 1 tsp. sugar
  • 1 tsp. salt
  • 2 cups all purpose flour
  • 1/2 cup very cold heavy cream or half and half (please, use heavy cream...)
Pre-heat oven to 400 degrees. In the bowl of a food processor, pulse the flour, sugar, salt, and fat about 10 times... until the texture is that of a coarse meal. Gradually pulse in the cream until a ball of dough forms. Turn out on to a floured surface.

Roll the dough into a 1-inch thick layer and cut into small biscuits with a shot glass or roughly with a paring knife.

Lay in a single layer on a baking sheet and bake for 15 minutes until golden brown. Cool for 10 minutes and serve warm.

Spring Weekend Menu

In Baltimore, Spring has certainly sprung. The degree of her springing varies by the day, but I decided to capitalize on warm weather last weekend and throw a dinner party that would celebrate the new season. I decided to make fried chicken, which I thought I posted here early on, but did not, so that is included below. I made a few cold sides, as well.

Fried Chicken
Serves 10
Prep Time: 20 minutes
Inactive Prep Time: 8 hours
Cook Time: 1 hour (or so, depending on frying vessel)

  • 2 fryer chickens, cut up into pieces (drumsticks, thighs, wings, and breasts), breasts halves cut into halves or thirds, depending on size -- reserve the neck and back for stock.
    • You could use pre-cut chicken, but there is a risk that the pieces will be large and uneven. Give some thought to breaking down your own bird. It's a skill worth having and easily  learned via a quick Google search.
  • 3 tbsp. salt (divided into 2 tbsp. for the chicken / 1 tbsp. to season the flour)
  • 2 tbsp. black pepper (divided)
  • 2 tbsp. garlic powder (divided)
  • 2 tsp. cayenne pepper (divided)
  • 1 quart buttermilk
  • 1/4 cup siracha chili sauce (or other hot sauce of your choosing)
  •  4 cups all purpose flour, for breading (seasoned, see the divided spices above)
  • Oil for frying (quantity depends on frying vessel used)
There is not an absolutely right or wrong way to go about this process, but regardless of your frying vessel, the procedure starts the same. Dust the chicken pieces with the salt, pepper, garlic, and cayenne -- generously, the quantities above are merely advisory. Toss to coat and place in a large mixing bowl. Meanwhile, mix the hot sauce and buttermilk. Pour over the chicken, taking care not to wash the seasoning off the meat.

This is the fruit of your labor!
Store in the refrigerator for at least 2 hours, but 8-24 hours is just fine. The acidic buttermilk will tenderize the chicken and help the seasoning penetrate the meat.

When ready to fry, pre-heat your oven to 300 degrees and leave it be for a moment. Meanwhile, bread the chicken. I prefer using a large tupperware storage container filled with seasoned flour (described in the ingredients) and shake the chicken in batches. Sometimes you need more or less flour depending on how wet your chicken is. When shaken, the chicken should be coated completely with dry flour.

Here is where things get sticky. If you use an electric deep fryer, pre-heat it to 370 degrees and fry the chicken until golden brown. Start with the dark meat and move on to the white meat. Drain on a baker's cooling rack and keep in a warm oven until the rest of the chicken is cooked, repeating the process in batches. If you're using a dutch oven or cast iron frying pan, heat the oil to 370 and use the same process, but you'll likely need to turn the chicken. Only ever fill the pan less than half full with oil to avoid overflowing.

When the chicken is all cooked, serve from the warm oven.
Mediterranean Pasta Salad

I made small cream biscuits on the side with whipped butter and cucumber salad, Mediterranean pasta salad, and a fresh, vinegar-based coleslaw.


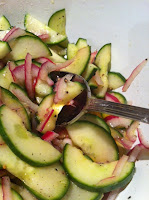
The cucumber salad could not have been simpler.
  •  1 large English cucumber
  • 1/2 red onion, very thinly sliced
  • 1/2 cup extra virgin olive oil
  • 1/4 cup plus 1 tbsp. white wine vinegar
  • 2 tsp kosher salt
  • 1 tsp coarsely ground black pepper
Cucumber Salad
You simply take one large English cucumber (the large variety, typically sold wrapped in plastic in the supermarket). Cut it in half lengthwise and spoon out the seeds, if desired. Slice the cucumber thinly. Slice a red onion very thinly. Toss with the oil, vinegar, salt, and pepper. Allow to rest in the refrigerator for 4-6 hours. Serve chilled.

The coleslaw is very similar. You simply take a head of savoy cabbage, remove the core, and shred thinly with a sharp knife. Toss with a half cup if white wine vinegar, a few tablespoons of excellent quality extra virgin olive oil, thinly sliced red onion, 4 grated carrots, salt, and coarsely ground pepper to taste. Chill for 24 hours. It couldn't be easier -- and is almost entirely calorie-free. 

That's how I chose to spend a Saturday evening! I hope that you'll find these ideas useful as you contemplate your Spring entertaining.


Monday, March 21, 2011

Caprese Skewers

Catering parties is a hobby that I've not recently indulged... until this weekend! Admittedly not original, this particular hors d'oeuvre is easy, no-cook, and absolutely fool proof. Enjoy!

Insalata Caprese on a Stick
Yield: 40 skewers
Prep Time: 30 minutes
  •  2 cups marinated bocconcini (recommended: Costco)
  • 200 or so large, fresh basil leaves
  • 2 pints grape or cherry tomatoes
  • 1/2 cup excellent quality olive oil
  • 1/3 cup excellent quality balsamic vinegar
  • 40 or so bamboo barbecue skewers
Assemble the skewers as pictured. Drizzle with oil and vinegar.
Much belated credit to sous chef Matthew Gray for assembling the skewers!

Cauliflower Gratin

I have long lauded the virtues of the humble cauliflower. I love the texture and rich savor flavor of this pale vegetable. It's not necessarily my favorite vegetable, but it certainly gets more attention from me than most of my foodie friends, it seems. I love cauliflower soup, roasted cauliflower, and the cauliflower gratin that I humbly present here. Its a simple process that I've repeated a couple of dozen times with the same result -- tender but firm cauliflower and a savory, crisp topping. Here, I deliberately omit the normally obligatory cream and cheese sauce. I think the cauliflower's complex taste deserves to shine, so I hope you'll give it a go without the added caloric luxuries.

Cauliflower Gratin
Serves 6
Prep Time: 10 minutes
Cook Time: 30 minutes
  • 1 large head cauliflower, cut into florets, stem diced
  • 1 cup grated gruyere or other quality Swiss cheese
  • 3 tbsp softened butter
  • 1/2 cup breadcrumbs (fresh are better, but dried will do)
  • 2 tsp salt
  • 1 tsp pepper
  • 1/8 tsp freshly ground nutmeg
  • 1 tbsp olive oil
The process is simple. Preheat the oven to 400 degrees. Toss the cauliflower with oil, salt, and pepper and place in an attractive baking dish. Roast for 20 minutes. Meanwhile, combine the grated cheese, nutmeg, butter, and breadcrumbs and form a coarse meal. After roasting, top the cauliflower with the breadcrumb and cheese mixture in an even layer and cook another 10 minutes until golden and crusty. The word gratin in French means crust, after all. You should find it crunchy, savory, and just a tad oozy with cheese.

Raw Sauces

As the weather warms, I am looking forward to trading in the gravy boat and sauce separator in favor of the food processor... to concoct raw sauces. I love to experiment with base greens and strong flavor variables to produce interesting and delicious pesto, persillade, pistou, and gremolata. Toying with various meats and pasta will create a new culinary canon for you. You'll find that there's almost no wrong pairing and that you don't need butter and stock to make a piece of chicken sing.

One night last week, I took a large, thin cut of sirloin and pan-seared it simply in olive oil. I topped it with what is technically a gremolata, or raw sauce of parsley, garlic, lemon zest, and olive oil. Here's how it went:

Simple Gremolata
Yield: 1 cup
Prep Time: 5 minutes
Cook Time: Read the title of the post, silly...
  • 1 cup parsley leaves
  • 1 large garlic clove, very roughly chopped, more if desired
  • 1 tsp salt
  • 1 tsp black pepper
  • 1/3 cup excellent quality extra virgin olive oil
  • 2 scallions
  • zest of 1 lemon
  • juice if 1/2 a lemon
In the bowl of a food processor fitted with a sharp steel blade, gently pulse every ingredient except the olive oil together about 10 times for about 2 seconds each. Adding the olive oil gently, pulse about 5-10 more times.

There are hundreds of variations you could try here... but this can get you started. Enjoy.

Tuesday, March 15, 2011

The Story of Leftover Takeout Rice

Last week, we tried to go out for pizza Iggy's, one of our favorite haunts in Baltimore. Our friends at the wine store (the restaurant is BYOB) reminded us that the restaurant is closed on Mondays. I was in no mood to cook. The solution? Chinese takeout. We've discovered a really good place that delivers quality "Chinese" food... the standard American fare but really exceeding expectations called Asian Harbor. There was a leftover pint of rice. Here's what I did with it...
Leftovers into Fried Rice
Serves 2 as a side, 1 as a lunch
Prep Time: 5 minutes
Cook Time: 10 minutes
  • 1 pint leftover steamed white rice
  • 1 tbsp vegetable oil
  • 1 small onion, finely diced
  • 1/2 cup carrots, medium diced
  • 1/2 cup frozen green peas
  • 2 tbsp soy sauce
  • 1/2 tsp siracha chili sauce (optional)
In a large non-stick skillet, cook the onion and carrots in oil until softened, but not browned. Add the rice and toss together with a non-metallic spoon or spatula (so as not to scratch your pan). If you can do the "chef toss" as in a wok, it is especially easy to combine the rice and vegetables. In fact, if you have a wok... use it here. Add the soy sauce and siracha sauce, if desired, and toss together until evenly combined and the rice is just starting to brown. Finally, add the peas, toss together, and cook for 2 or 3 minutes until the peas are just thawed.

This particular preparation is deliberately basic. You can augment the technique with scrambled egg, thawed shrimp or sliced chicken, or any other accoutrement of your choosing. I liked this preparation as a base for your creations. It also happens to be vegan, which is pleasant for some readers... and eaters!