Showing posts with label Sides. Show all posts

Friday, June 10, 2011

Garlic Bread

Perfect Garlic Bread
2 loaf ciabatta bread (we used bread with extra garlic baked into the bread, but any will work)
2 tbsp finely minced garlic
1/2 tsp salt
1/2 tsp pepper
1/4 cup olive oil
1/2 stick butter
1/4 tsp dried oregano

Pre-heat oven to 375 degrees. Melt butter and oil and add garlic. Cook over low heat for 15 minutes, taking care not to burn. Season with salt, pepper, and oregano.

Cut the ciabatta bread lengthwise into two large halves, doubling the surface area. Carefully, with a spoon, drizzle the garlic butter and oil all over the bread, spreading the softened garlic as necessary and the entire loaf is evenly coated.

Bake for 15-20 minutes at 375 degrees until the top is just golden brown and crunchy. Take care not to burn.

Cut into individual pieces and serve warm with any Italian dish.

Sunday, April 17, 2011

Grilled Steak and Sides

Grilled steak is nothing original. I have my own go-to recipe here. Experimenting, though, with the grill and the skillet, I have developed an interesting approach to a couple of sides I think you'll love.
First, Broccoli Steaks are unusual, but delicious. Using the heat of your grill -- I have a charcoal grill that cannot justify only cooking a simple steak -- grill large hunks of broccoli until tender and smoky. Cut the stem off a head of broccoli and slice the head into large "steaks" of even thickness. Drizzle generously with olive oil and season with salt and pepper. The addition of fresh or dried herbs makes for a more complex flavor.
Grill similarly to your technique for steak. I like using direct heat for 4 minutes per side and then finishing with indirect heat for another 10 minutes or so.
The other side, which is hard to make out in the photo, is red wine braised mushrooms and onions.
Coarsely chop a pint of cremini mushrooms and a large onion. Saute in olive oil for 10 minutes until just starting to brown and add a half cup of red wine (I used a shiraz that had been opened a week earlier and had passed its prime). Season with salt and pepper and reduce until the wine is syrupy. Serve as a sauce or side to grilled steak and broccoli and you can hardly go wrong.

Friday, April 15, 2011

Tiny Cream Biscuits

There is a traditional recipe for cream biscuits, but I find that a whole biscuit is too much for a guest as a side bread at supper. Here, you can use a shot glass as your biscuit cutter and serve these small puffs of fatty pastry with accoutrements to your heart's content.

Tiny Cream Biscuits
Yield: About 20 biscuits
Prep Time: 5 minutes
Cook Time: 15 minutes
  • 1/2 stick unsalted butter, chilled and cubed
  • 2 tbsp. chilled vegetable shortening (recommended: Crisco baking sticks)
  • 1 tsp. sugar
  • 1 tsp. salt
  • 2 cups all purpose flour
  • 1/2 cup very cold heavy cream or half and half (please, use heavy cream...)
Pre-heat oven to 400 degrees. In the bowl of a food processor, pulse the flour, sugar, salt, and fat about 10 times... until the texture is that of a coarse meal. Gradually pulse in the cream until a ball of dough forms. Turn out on to a floured surface.

Roll the dough into a 1-inch thick layer and cut into small biscuits with a shot glass or roughly with a paring knife.

Lay in a single layer on a baking sheet and bake for 15 minutes until golden brown. Cool for 10 minutes and serve warm.

Spring Weekend Menu

In Baltimore, Spring has certainly sprung. The degree of her springing varies by the day, but I decided to capitalize on warm weather last weekend and throw a dinner party that would celebrate the new season. I decided to make fried chicken, which I thought I posted here early on, but did not, so that is included below. I made a few cold sides, as well.

Fried Chicken
Serves 10
Prep Time: 20 minutes
Inactive Prep Time: 8 hours
Cook Time: 1 hour (or so, depending on frying vessel)

  • 2 fryer chickens, cut up into pieces (drumsticks, thighs, wings, and breasts), breasts halves cut into halves or thirds, depending on size -- reserve the neck and back for stock.
    • You could use pre-cut chicken, but there is a risk that the pieces will be large and uneven. Give some thought to breaking down your own bird. It's a skill worth having and easily  learned via a quick Google search.
  • 3 tbsp. salt (divided into 2 tbsp. for the chicken / 1 tbsp. to season the flour)
  • 2 tbsp. black pepper (divided)
  • 2 tbsp. garlic powder (divided)
  • 2 tsp. cayenne pepper (divided)
  • 1 quart buttermilk
  • 1/4 cup siracha chili sauce (or other hot sauce of your choosing)
  •  4 cups all purpose flour, for breading (seasoned, see the divided spices above)
  • Oil for frying (quantity depends on frying vessel used)
There is not an absolutely right or wrong way to go about this process, but regardless of your frying vessel, the procedure starts the same. Dust the chicken pieces with the salt, pepper, garlic, and cayenne -- generously, the quantities above are merely advisory. Toss to coat and place in a large mixing bowl. Meanwhile, mix the hot sauce and buttermilk. Pour over the chicken, taking care not to wash the seasoning off the meat.

This is the fruit of your labor!
Store in the refrigerator for at least 2 hours, but 8-24 hours is just fine. The acidic buttermilk will tenderize the chicken and help the seasoning penetrate the meat.

When ready to fry, pre-heat your oven to 300 degrees and leave it be for a moment. Meanwhile, bread the chicken. I prefer using a large tupperware storage container filled with seasoned flour (described in the ingredients) and shake the chicken in batches. Sometimes you need more or less flour depending on how wet your chicken is. When shaken, the chicken should be coated completely with dry flour.

Here is where things get sticky. If you use an electric deep fryer, pre-heat it to 370 degrees and fry the chicken until golden brown. Start with the dark meat and move on to the white meat. Drain on a baker's cooling rack and keep in a warm oven until the rest of the chicken is cooked, repeating the process in batches. If you're using a dutch oven or cast iron frying pan, heat the oil to 370 and use the same process, but you'll likely need to turn the chicken. Only ever fill the pan less than half full with oil to avoid overflowing.

When the chicken is all cooked, serve from the warm oven.
Mediterranean Pasta Salad

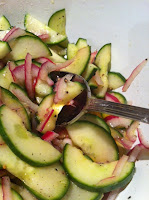
I made small cream biscuits on the side with whipped butter and cucumber salad, Mediterranean pasta salad, and a fresh, vinegar-based coleslaw.


The cucumber salad could not have been simpler.
  •  1 large English cucumber
  • 1/2 red onion, very thinly sliced
  • 1/2 cup extra virgin olive oil
  • 1/4 cup plus 1 tbsp. white wine vinegar
  • 2 tsp kosher salt
  • 1 tsp coarsely ground black pepper
Cucumber Salad
You simply take one large English cucumber (the large variety, typically sold wrapped in plastic in the supermarket). Cut it in half lengthwise and spoon out the seeds, if desired. Slice the cucumber thinly. Slice a red onion very thinly. Toss with the oil, vinegar, salt, and pepper. Allow to rest in the refrigerator for 4-6 hours. Serve chilled.

The coleslaw is very similar. You simply take a head of savoy cabbage, remove the core, and shred thinly with a sharp knife. Toss with a half cup if white wine vinegar, a few tablespoons of excellent quality extra virgin olive oil, thinly sliced red onion, 4 grated carrots, salt, and coarsely ground pepper to taste. Chill for 24 hours. It couldn't be easier -- and is almost entirely calorie-free. 

That's how I chose to spend a Saturday evening! I hope that you'll find these ideas useful as you contemplate your Spring entertaining.


Monday, March 21, 2011

Cauliflower Gratin

I have long lauded the virtues of the humble cauliflower. I love the texture and rich savor flavor of this pale vegetable. It's not necessarily my favorite vegetable, but it certainly gets more attention from me than most of my foodie friends, it seems. I love cauliflower soup, roasted cauliflower, and the cauliflower gratin that I humbly present here. Its a simple process that I've repeated a couple of dozen times with the same result -- tender but firm cauliflower and a savory, crisp topping. Here, I deliberately omit the normally obligatory cream and cheese sauce. I think the cauliflower's complex taste deserves to shine, so I hope you'll give it a go without the added caloric luxuries.

Cauliflower Gratin
Serves 6
Prep Time: 10 minutes
Cook Time: 30 minutes
  • 1 large head cauliflower, cut into florets, stem diced
  • 1 cup grated gruyere or other quality Swiss cheese
  • 3 tbsp softened butter
  • 1/2 cup breadcrumbs (fresh are better, but dried will do)
  • 2 tsp salt
  • 1 tsp pepper
  • 1/8 tsp freshly ground nutmeg
  • 1 tbsp olive oil
The process is simple. Preheat the oven to 400 degrees. Toss the cauliflower with oil, salt, and pepper and place in an attractive baking dish. Roast for 20 minutes. Meanwhile, combine the grated cheese, nutmeg, butter, and breadcrumbs and form a coarse meal. After roasting, top the cauliflower with the breadcrumb and cheese mixture in an even layer and cook another 10 minutes until golden and crusty. The word gratin in French means crust, after all. You should find it crunchy, savory, and just a tad oozy with cheese.

Tuesday, March 15, 2011

The Story of Leftover Takeout Rice

Last week, we tried to go out for pizza Iggy's, one of our favorite haunts in Baltimore. Our friends at the wine store (the restaurant is BYOB) reminded us that the restaurant is closed on Mondays. I was in no mood to cook. The solution? Chinese takeout. We've discovered a really good place that delivers quality "Chinese" food... the standard American fare but really exceeding expectations called Asian Harbor. There was a leftover pint of rice. Here's what I did with it...
Leftovers into Fried Rice
Serves 2 as a side, 1 as a lunch
Prep Time: 5 minutes
Cook Time: 10 minutes
  • 1 pint leftover steamed white rice
  • 1 tbsp vegetable oil
  • 1 small onion, finely diced
  • 1/2 cup carrots, medium diced
  • 1/2 cup frozen green peas
  • 2 tbsp soy sauce
  • 1/2 tsp siracha chili sauce (optional)
In a large non-stick skillet, cook the onion and carrots in oil until softened, but not browned. Add the rice and toss together with a non-metallic spoon or spatula (so as not to scratch your pan). If you can do the "chef toss" as in a wok, it is especially easy to combine the rice and vegetables. In fact, if you have a wok... use it here. Add the soy sauce and siracha sauce, if desired, and toss together until evenly combined and the rice is just starting to brown. Finally, add the peas, toss together, and cook for 2 or 3 minutes until the peas are just thawed.

This particular preparation is deliberately basic. You can augment the technique with scrambled egg, thawed shrimp or sliced chicken, or any other accoutrement of your choosing. I liked this preparation as a base for your creations. It also happens to be vegan, which is pleasant for some readers... and eaters!

Thursday, December 30, 2010

Potato and Onion Kugel

One of the side dishes that people request most at the meals I serve around Jewish holidays is my broccoli and leek kugel. I have not posted the recipe here because it's still being refined for publication, but here is a version of the basic potato and onion kugel that I think you'll love.

Potato and Onion Kugel
Serves 6-8
Prep Time: 20 min.
Cook Time: 1 hr. 30 min.
  • 2 large russet potatoes, peeled and grated
  • 2 large onions, thinly sliced
  • 2 tsbp vegetable oil (to saute the onions)
  • 4 cups prepared mashed potatoes
  • 1 cup flour or matzah meal
  • 4 eggs
  • 1/4 cup olive oil
  • 1/2 cup water or vegetable stock
  • 2 cloves garlic, finely minced
  • salt and pepper to taste
Whisk together the flour / meal, eggs, oil, and water / stock. Set aside.
Saute the onions in a large pan in a few tbsp of vegetable oil until softened, but not brown.
Toss the onions with the grated potatoes. Fold the onions and potatoes with the flour mixture and the mashed potatoes until smooth and the shredded vegetables are evenly distributed.
Spread mixture in a greased baking dish (9 x 13) and bake at 350 degrees for an hour until golden on top and fluffy.

Homemade Applesauce

Homemade Applesauce
Yield: 4 cups applesauce
Prep Time: 10 minutes
Cook Time: 1 hour
  • 6 large apples - peeled, cored, and roughly diced
  • 2 tbsp - 1/4 cup sugar, depending on your preferred sweetness and the selection of apples
  • 1 tsp cinnamon
  • 1/4 tsp salt
  • 1/4 cup reserved apple peel or 2 tbsp cranberry juice
Toss the apples with the salt, sugar, apple peel, and cinnamon in a large baking dish. Roast at 350 degrees for an hour, until apples are tender. Mash through a food mill or with a potato masher, allow to cool, and store in the refrigerator or serve warm.

Saturday, June 26, 2010

Almost Instant White Bean Dip

My e-mail box is full of questions about light, summery dips. People are fortunately stepping away from the same old (but sometimes good) canned salsas, french onion dips, and cheesy mayonnaise of our parents' generation and looking to fresh or healthy ingredients for parties and barbecues. This dip is very similar to hummus, but not quite as thick.

White Bean Dip
  • 2 cans cannellini beans, drained and rinsed
  • 2 tbsp freshly squeezed lemon juice
  • 1/4 cup extra virgin olive oil -- use the good stuff here
  • 1 clove garlic, minced
  • salt and pepper, to taste
Combine all ingredients except the oil in the bowl of a food processor fitted with the steel blade. Turn on and drizzle in the olive oil until desired consistency.

Thursday, June 10, 2010

Reader Question - Cooking with Citrus

Lauren from Charlotte asks...

"Summer is here! I really love the taste of citrus and would like to cook with citrus more often. What are some ways to incorporate citrus into my dinner menu?"

Citrus certainly does brighten up a summer menu. You're in luck, though. The only limit to incorporating delicious, fresh citrus into your dinner is your imagination. Whether it's oranges, lemons, grapefruits, or limes, the juice and the zest packs a huge flavor punch and partners especially well with summery foods like salads and fish. There's no need to limit your citrus flavors to dinner, by the way. A ruby red grapefruit makes a fantastic breakfast and you can't beat a mandarin orange salad for a light lunch. Citrus also has the added benefit of being very good for you. Here's a great marinade recipe to get started, and I'll share a few technique ideas at the end.

Citrus Marinated Chicken
Serves 6
Prep Time: 20 minutes
Inactive Prep Time: 8 hours / all day / overnight
Cook Time: 30-40 minutes
  • 1 chicken, cut into pieces
    • You can also use boneless, skinless breasts or thighs, or even just the wings for an interesting twist on party wings
    • Pork tenderloin also works very well here, as does swordfish or halibut. With fish, only marinate about 30 minutes, to avoid an unpleasant "ceviche" effect
  • 1 tbsp lemon zest, about 1 large lemon
  • juice of the same lemon
  • 1 tbsp orange zest, about 1/2 a large orange
  • juice of the same orange
  • 1 cup sauvignon blanc or other fruit white wine
    • if you do not cook with alcohol, use 1/4 cup of white wine vinegar with 3/4 cup of water
  • 1/4 cup extra virgin olive oil
  • 4 sprigs thyme
  • 2 sprigs rosemary
  • 2 large, 4 medium sprigs oregano
  • 2 cloves garlic, crushed but not chopped
  • 2 tsp salt
  • 2 tsp black pepper
Whisk together the liquid ingredients and zest with the salt and pepper. Add the herbs and garlic. Pour into a gallon-sized plastic zipper bag and add the chicken, pork, or fish. Marinate for 8 hours for chicken and pork, or 30 minutes for swordfish or halibut. Do not use a delicate fish, although this can be adapted into a sauce for a more delicate fish. In such a case, omit the wine and herbs and mince the garlic. Add a touch of mustard and whisk vigorously with the olive oil, like in our vinaigrette recipes. Season with salt and pepper and pour over the cooked fish.


Some Technique Ideas

You can always rely on a good lemon vinaigrette, as noted in our salad dressing post, and incorporate lemon and lime zest into fish and poultry dishes. Everyone knows that lemon juice goes well with fish, but the zest brings a completely different and equally magnificent layer of citrus punch. Lamb also takes lemon zest well with garlic. A lemon compound butter (lemon zest mashed with a few tablespoons of butter, salt, pepper, and parsley) goes well on chicken, fish, or steak.
Don't forget dessert! Lemon bars, orange sherbet, lime sorbet... All delicious homemade or store-bought and packed with summer freshness. I hope this helps! Enjoy.

Thursday, May 27, 2010

Broccoli Gratin

If you're looking for an easy side dish for a dinner party, this gratin is for you. Once you've mastered the technique of a basic gratin, you can gratin anything -- broccoli, cauliflower, potatoes, eggplant, zucchini... the list goes on. It's even the same idea as my macaroni and cheese! Give it a try!

Broccoli Gratin
Serves 6-8
Prep Time: 10 minutes
Cook Time: 30 minutes
  • 3 heads broccoli, chopped into florets / small diced stems
  • 2 cups cheddar cheese, grated
  • 1 cup Swiss cheese, such as gruyere, grated
  • 4 cups half and half
  • 2 tsp garlic powder
  • 1/2 stick butter (4 tbsp)
  • 1/4 cup flour
  • salt and pepper to taste
Pre-heat the oven to 425 degrees. Steam the broccoli with a vegetable steamer for about 10 minutes, until just softened but not mushy. Test after 5 minutes to be sure it's not cooking to quickly.
Warm the half and half in a saucepan over low heat.
Melt the butter in a saucepan over medium heat until just foaming. Add the flour and whisk until combined. Allow to cook for a minute or so. Do not burn.
Whisk in the half and half and allow to come to  a simmer. Whisk in the grated cheeses, garlic powder, salt and pepper. Stir until smooth.
Toss with the broccoli and pour into a baking dish.
Bake at 425 degrees for 10-15 minutes until browned on top and bubbling.

Roasted Potato Salad

My neighbors and I have established a wonderful tradition of "Sunday Funday," which provides a great opportunity for us to cook and drink together and with other friends. Last week, we enjoyed two completely separate meals, both delicious, and I was reminded of this dish that I used to bring to summer barbecues. It's much along the lines of my aforementioned coleslaw, meaning it's mayonnaise free, but also brings other flavors to the table. It couldn't be easier, so I hope you'll try it for your next picnic.

Roasted Potato Salad
Serves 6-8
Prep Time: 10 minutes
Cook Time: 30-45 minutes, plus overnight to chill
  • 3-5 lbs Yukon gold potatoes or red potatoes
  • 2 medium shallots, sliced
  • 2 tbsp. parsley, chopped
  • 1 recipe white wine vinaigrette
  • 8 oz. bacon (about 8 slices), crisped and crumbled
  • 1/2 cup crumbled feta
  • 1 tbsp salt
  • 1/2 tbsp pepper
Pre-heat the oven to 400 degrees. Cut the potatoes into quarters or eighths and toss with salt and pepper.
Roast on a parchment or foil-lined baking sheet for 30-45 minutes until tender. Allow to cool completely.
Toss gently with the remaining ingredients and allow to chill for a few hours to overnight.

Monday, May 24, 2010

Mango Salsa

A twist on a classic, this salsa will go over really well at parties. It's also great during casual barbecues and keeps well in the fridge for a week or so. Serve with chips as a dip or over chicken or pork as a delicious raw sauce.

Mango Salsa
Serves 12 as a dip
Prep Time: 20 min.
Cook Time: None 

  • 1/2 cup diced red onion
  • 2 cups chopped tomato
  • 2 cups diced fresh mango
  • 1/4 cup chopped parsley
    • Cilantro is traditional, but I am one of those with the genetic cilantro aversion. Use what you like.
  • 2 tbsp chopped fresh mint
  • 1 jalapeno pepper, finely diced
  • 2 tsp salt
  • 1 tsp pepper
  • 1/4 lemon juice
  • 1/4 cup extra virgin olive oil
Combine all ingredients in a glass or other non-reactive bowl. Taste for seasonings and adjust to your taste. Allow to sit for a few hours before serving.

Thursday, May 13, 2010

Potato Wedges

For some reason, I have accidentally omitted potatoes from my shopping lists lately. It's a shame, because I love to make herb roasted potatoes with meat or chicken. A couple of months ago, the local supermarket had some huge russet baking potatoes on sale, so I bought a couple of pounds. Baking potatoes are a little mealy for roasted potatoes, but great for potato wedges. Here's an easy recipe for wonderful baked potato wedges with a seasoning mix that helps them get delightfully crisp.

Potato Wedges
Serves 4
Prep Time: 5 minutes
Cook Time: 40 minutes 
  • 2 large russet potatoes
  • 1/4 cup vegetable oil
  • 1 tsp cayenne pepper
  • 1 tsp finely ground black pepper
  • 1/2 tsp paprika
  • 1 tsp thyme
  • 1 tsp garlic powder
  • 2 tsp kosher salt (plus more to taste)
Pre-heat the oven to 425 degrees. Line a baking sheet with parchment paper or aluminum foil. Cut the potatoes into wedges, about into eighths.
Toss the potatoes with the oil and spices until evenly coated.
Place in a single layer on the sheet pan, arranged neatly for easy turning.
Bake for 20 minutes. Turn each potato wedge over to brown the other side.
Bake for another 20 minutes, until brown and crisp. If the potatoes are resisting browning in your oven, as they do in mine occasionally, feel free to turn on the broiler for a few minutes. Watch them carefully!
Serve at cookouts, especially with burgers in lieu of french fries!

Wednesday, May 12, 2010

Ginger Dressing

This is one of those recipes I have to post by popular demand of my friends. It's based on a salad dressing they used to serve at a great sushi place in Charleston on King Street called Sushi Hiro. I confess I haven't eaten at Sushi Hiro in years, but this particular condiment from the early 2000's is certainly a keeper.
This makes about a pint and a half of dressing, so I'd say package it in old pasta sauce jars and it should keep up to a month in the fridge. It's wonderful on salad, but also a pretty good dip for crudites or topping for fish or grilled chicken.

Ginger Dressing
Yields 14 oz +/- of dressing
Prep Time: 10 minutes
  • 1 cup peeled, chopped carrot
  • 1/2 cup chopped fresh onion (about 1 chopped small onion)
  • 1/4 cup peeled, chopped fresh ginger
  • 1/4 cup soy sauce
  • 1 tbsp siracha chili sauce
  • 2 large cloves garlic, peeled and roughly chopped
  • 2 tbsp ketchup
  • 1/4 cup rice wine vinegar or white wine vinegar
  • 1/2 cup vegetable oil
  • salt and pepper to taste
Combine all ingredients except the oil in the bowl of a food processor or blender. While the mixture is being blended, drizzle in the oil until the dressing is smooth. Tiny bits of ginger and carrot will remain. This is the desired texture.
Taste for seasonings. Adjust according to your taste. I often find that, depending on the strength of the onion or sweetness of the carrots, you may want more vinegar or soy sauce).
Blend again and chill before serving.

Thursday, April 22, 2010

Caramelized Onion Dip

This is easily the best onion dip I have ever had. It has all the flavor of the store bought stuff, but really sings with fresh, quality ingredients. I love serving it with any kinds of chips or crackers alongside other dips and salsas. There are admittedly a few more steps than opening a jar here, but I promise it's worth it. Let me know what you think!

Caramelized Onion Dip
Makes 2 cups of dip
Prep Time: 10 minutes
Cook Time: 30-40 minutes
  • 1 medium onion, finely diced (about 1 cup of diced onion)
  • 1/3 cup thinly sliced scallions
  • 1/2 tsp sugar
  • 1/2 tsp salt
  • 1 tsp black pepper
  • 3/4 cup Greek yogurt (such as Fage)
  • 1/4 cup sour cream
  • 1/4 cup cream cheese (recommend neufchatel), softened
  • 1 tbsp olive oil
In a large skillet, caramelize the onions. This sounds simple, but it's not quite the same as sauteed onions. Here's how to properly caramelize onions --
  • Pre-heat the skillet over medium low heat.
  • Add the oil and allow to come up to temperature.
  • Add the onions and allow them to sizzle for a while, then toss to coat evenly with the oil.
  • Season with salt.
  • Turn the heat to low and allow the onions to cook for about 30 minutes, stirring and flipping occasionally to brown evenly.
  • Sprinkle with the sugar.
  • Allow to cook for 10 minutes more, until the onions are well-browned, but not burned. This is a careful distinction, so be careful. Pay attention these last few minutes.
Allow the onions to cool.  Blend together with a rubber spatula with the remaining ingredients. Taste for seasoning. Allow to chill before serving.

Tuesday, April 20, 2010

Leftover Mashed Potato Pancakes

Even with six people around the table, it's sometimes hard to finish a whole recipe of mashed potatoes. When it's just the two of us eating, I still usually make enough to serve a small, hungry army. I have recently begun to experiment with ways to make leftover mashed potatoes more interesting. I've tried diluting them with stock and milk to make soup, which turns out fine, but not that exciting. I have mashed them together with leftover broccoli and cheese to make a nice, small casserole. Also good, but not something I'd consider "blog-worthy." The last few times I played with the leftovers, I went with simplicity -- and the result was perfection.

Mashed Potato Pancakes
Serves 2, usually, depending on how many leftovers you have
Prep Time: 5 minutes
Cook Time: 7 minutes
  • 2-3 cups leftover mashed potatoes
  • 1/2 cup flour
  • 2 eggs
  • 1/2 tbsp salt
  • 1/2 tbsp pepper
  • 2-3 tbsp chopped scallions
  • 1 tbsp butter
  • 1 tbsp vegetable or light olive oil
Whisk together all the ingredients except the butter and oil. Make sure everything is evenly and thoroughly incorporated.
In a large skillet, heat the oil and butter together until the butter is melted and just sizzling.
Add 1/2 cup or so of the mixture to the pan about 2 inches part, depending on the size of your skillet. You can also use an electric griddle.
Saute until golden brown and the mixture just starts to set, about 3 minutes. Flip and cook for 2 or 3 minutes more, until heated through and just set. They should resemble normal pancakes.
Serve hot.

Grilled Shrimp Skewers

Why has it become so common for home cooks (and even some restaurants) to put 5 or 10 different items, all with different cooking times, on one skewer? I always prefer to put one item on each skewer and everyone can select skewers of the items they want, and nothing is horribly over- or under-cooked. There are tons of different skewer-friendly foods that I will post throughout the summer, but here's what I like to do with shrimp.

Grilled Shrimp Skewers
Serves 4
Prep Time: 20 minutes
Cook Time: 5 minutes
  • 2 lbs shrimp, 15-20 count, peeled and de-veined
  • 1/4 cup lemon juice
  • 2 tbsp lemon zest
  • 2 tbsp olive oil
  • 2 tbsp chopped parsley
  • 1 tbsp kosher salt
  • 1/2 tbsp black pepper
  • 1/2 tsp crushed red pepper flakes
  • 1 tsp garlic paste
    • finely chopped garlic that has been mashed with the edge of a knife or with a mortar and pestle
  • 1 tsp dill, finely chopped
Soak 15-20 bamboo skewers in water to avoid burning on the grill. Combine all ingredients, except the shrimp, in a mixing bowl. Toss with the shrimp and allow to sit for 10 minutes.
Pre-heat a gas or charcoal grill (or a grill pan or oven's broiler)
Skewer 3-5 shrimp on each stick.
Grill over high heat for 2 minutes or so, just until the shrimp are opaque. Serve warm over salad greens such as arugula with just an extra splash of lemon juice and drizzle of extra virgin olive oil.

Friday, April 9, 2010

Cherry Tomato Salad with Red Onions & Parsley

As you may have guessed from my previous post, I love tomatoes. They're not usually ready until the middle of June or the beginning of July, though, so it's always challenging (and often disgusting) to make food with tomatoes in the cooler months. The solution is sometimes canned tomatoes, such as in sauces. It's sometimes sun dried  tomatoes, such as in salads. When you just need fresh tomatoes, however, the solution is generally cherry tomatoes, grape tomatoes, or teardrop tomatoes. The smaller varieties have much more concentrated flavor, come from reliable sources in large quantities, and are always delicious.
It's become more and more common at grocery stores and farmers' markets to carry heirloom varieties of smaller tomatoes. I cannot recommend more highly that you try these unique little treasures. You can find purple, striped, green, yellow, orange... any color and flavor of tomato you can imagine. Try this recipe with the standards you'll find in the grocery --  but it's really designed to stand out with the special tomatoes that you only find when you really look.

Tomato Salad
Serves 6
Prep Time: 30 minutes
Cook Time: None
  • 2 pints cherry or grape tomatoes, or small heirloom tomatoes (about 2 lbs)*
  • 1/4 cup finely chopped red onion
  • 2 tbsp chopped parsley
  • 1/4 cup extra virgin olive oil (this is the place for your best stuff)
  • 2 tbsp balsamic vinegar (see above)
  • salt and pepper to taste
Carefully slice each tomato in half. Toss with the onion, parsley, oil, and vinegar. Taste for seasonings.
Add salt and pepper to your desired taste. Serve at room temperature.

*Never refrigerate tomatoes. It changes the texture and flavor more than you will realize. I know lots of people say it helps them keep longer, but this is not really true. They may look fine on the outside, but they're mushier inside even after a few hours in the fridge and will never taste the same again.

Thursday, April 8, 2010

Corn 3 Ways

Corn is absolutely one of my favorite vegetables. Whether it's driving through rural South Carolina or my frequent trips through Maryland on my way to the beach in Delaware, the stalks of corn seem to frame my summer. Even in the winter months, canned and frozen corn are always around so I don't miss that crisp sweetness any time of year.
Here are three distinct techniques for preparing corn, ranging from simple to more involved. You may recall my corn salad recipe from a few months ago. I have all the ingredients ready in my kitchen now, but it's fun to change it up a bit.

Steamed Corn
Serves as many as ears of corn you prepare
Prep Time: None
Cook Time: 15 minutes

  • Whole ears of fresh corn, husk on
  • Water
  • Salt
  • Butter 
Bring a large pot, filled 3 inches with water, fitted with a vegetable steamer, to a boil. If you don't have a vegetable steamer, don't worry about it. Add the corn and cover. Steam for 10-15 minutes. Remove carefully (with tongs) and serve immediately.
Each diner can remove the husks and silk at their place and season and butter their corn according to their own preference.
Is this too simple? Boring? Ok. Well try this...


Grilled Corn with Bacon
Serves 4
Prep Time: 20 minutes
Cook Time: 20 minutes
  • 4 ears corn, husks and silks removed
  • 1/4 cup crumbled, cooked bacon, divided
  • 4 tbsp butter, divided
  • 2 tbsp chopped chives
  • 2 tbsp chopped parsley
  • 1 tbsp hot Hungarian paprika
  • salt and pepper to taste
Pre-heat a grill on high.
Tear 4 roughly 1 ft squares of aluminum foil. In the center of each, place an ear of corn.
Top with 1 tbsp of butter, a sprinkle of chives, parsley, paprika, salt, and pepper. Crumble about a tbsp of bacon over each.
Close the foil tightly.
Grill, butter side up, for 10 minutes. Turn. Cook another 5 minutes.
Remove from heat and serve in the foil on plates, so the butter doesn't burn the diner.


Do you find the cobs daunting? Here we go...


Sauteed Fresh Corn
Serves 4
Prep Time: 10 minutes
Cook Time: 10 minutes
  • 4 ears corn, off the cob
  • 1 tsp crushed red pepper flakes
  • 2 tbsp butter
  • 1 tbsp lemon zest
  • 2 tbsp parsley, finely chopped
  • 4 scallions, thinly sliced 
  • salt and pepper to taste
Melt the butter in a large skillet. Add the pepper flakes and lemon zest and cook for about a minute. Add the corn and stir until combined. Cook for another 5 minutes. Season with salt and pepper. Toss in the scallions and parsley and cook for another 2-3 minutes. Serve immediately.