Friday, June 10, 2011

Garlic Bread

Perfect Garlic Bread
2 loaf ciabatta bread (we used bread with extra garlic baked into the bread, but any will work)
2 tbsp finely minced garlic
1/2 tsp salt
1/2 tsp pepper
1/4 cup olive oil
1/2 stick butter
1/4 tsp dried oregano

Pre-heat oven to 375 degrees. Melt butter and oil and add garlic. Cook over low heat for 15 minutes, taking care not to burn. Season with salt, pepper, and oregano.

Cut the ciabatta bread lengthwise into two large halves, doubling the surface area. Carefully, with a spoon, drizzle the garlic butter and oil all over the bread, spreading the softened garlic as necessary and the entire loaf is evenly coated.

Bake for 15-20 minutes at 375 degrees until the top is just golden brown and crunchy. Take care not to burn.

Cut into individual pieces and serve warm with any Italian dish.

Thursday, May 19, 2011

Pasta with Broccoli Rabe and White Beans

We used to have dinner with our neighbors in Washington at least once a week. Our taste in food was nearly identical and we loved to cook, eat, and drink together. One the best gifts our upstairs friends gave me was a love of the combination of broccoli rabe (rappini) and white beans. I soon adopted the standard sauteed rabe and white beans as a side with chicken, fish, or pork. As I learned more about the green vegetable, I realized that the result of my work was sometimes uneven because of the common bitterness in the greens. Sometimes it's not a problem, but in order to know for sure if your rabe will be bitter, taste a floret. If it's pleasant and sweet, cook it together with the beans and oil directly. If it's bitter or unpleasant at all, blanche the greens for the final 2 minutes of the pasta's cooking time in the water and you'll find the bitterness is left with the water and the pasta is unaffected. I like to add cubed poached chicken breast to the beans and rabe as an extra boost of protein and texture, but this could easily be a vegetarian / vegan dish, as well. If made with a different shape pasta such as rotini or penne, this could easily be a casserole.

Pasta with Broccoli Rabe, Chicken, and White Beans
Serves 4
Prep Time: 10 minutes
Cook Time: 20 minutes

  • 1 lb thin spaghetti pasta, cooked al dente
  • 2 cans white beans (Great Northern, Cannellini), drained and rinsed
  • 2 boneless skinless chicken breasts, poached in stock and white wine, cooled and cubed
    • simmer equal parts chicken stock and white wine in a sauce pan and cook chicken gently until firm through, about 12 minutes
  • 2 bunches broccoli rabe, stems trimmed off and coarsely chopped
  • 3 cloves minced garlic
  • 1/4 cup extra virgin olive oil
  • 1/4 cup grated onion
  • 2 tbsp butter (optional, for richness)
  • Crushed red pepper flakes (optional, for heat, to taste)
  • Salt and pepper, to taste
Poach the chicken, cube, and set aside. Boil the pasta according to package instructions, minus about 1 minute. Taste the pasta to make sure it's done. If your broccoli rabe is bitter, blanche it with the pasta for the last couple of minutes of cooking. I use a large pot with a pasta insert so it's easy enough to lift everything from the pot together. If you don't have such a contraption, by all means, simply drain in colander.
Meanwhile, in a large skillet, heat the oil over medium heat. Add the onions until fragrant and add the garlic. Cook for about a minute. Add the drained white beans and toss together until the beans are heated through. Add the chicken and toss again. Season carefully and add the broccoli rabe and pasta. Toss until everything is combined. Finish with a drizzle of olive oil or a dash of butter to taste, if desired.

Monday, April 25, 2011

Insomniac Food Blogging

It's Easter Sunday -- sort of. After a wonderful day at the farmer's market (open Sunday mornings on Guilford Ave. in Baltimore under the Jones Falls Expressway) we did a little bit of shopping and attended a wonderful dinner reception hosted by some friends in Fells Point. The food was delicious -- particularly the salmon caviar and selection of smoked fish. My contribution was a German-style potato salad that resembles my Roasted Potato Salad, but uses steamed potatoes and a mustardy dressing. I omitted the bacon in a nod to Passover, during which I am more conscious of my diet.

After a few glasses of Sangria, it was time to go home and take a nap. That nap lasted a few more hours than it should have, so here I sit, 3:20 in the morning, wide awake.

I'm distracting myself with some food reading. I thought it may interest some readers to know some of the food blogs, websites, and other resources I regularly enjoy...


What sorts of sites / blogs / cookbooks / magazines do you recommend for your humble author and your fellow insomniac food fans?

Monday, April 18, 2011

An update to braised pork shoulder...

Find it here!

Simple Lunch Salad

A few weeks ago, I came home to walk the dogs during lunch and found myself without much to eat in the house. I could have picked up a sandwich from Subway or another quick restaurant on the way back and forth to my office, but I accepted the challenge to have a quick lunch at home with some enthusiasm. Opening the refrigerator, I found a big bag of baby carrots and a tiny sack of whole radishes. Tomatoes are not in season yet, but I tend to keep a carton of cherry tomatoes on the counter year-round. Here's what I came up with...
Fresh Early Spring Salad
Serves 1
Prep Time: 5 min.
Cook Time: None
  • 8 cherry tomatoes, halved
  • 10 baby carrots, julienned (cut into matchsticks)
  • 4 radishes, julienned (cut into matchsticks)
  • 1/4 cup excellent quality extra virgin olive oil
  • 2 tbsp white wine vinegar or lemon juice
  • salt and pepper to taste
Prepare the ingredients as described and toss together. Enjoy on its own or as a prelude to a sandwich of leftovers from your dinner party the night before! 

Sunday, April 17, 2011

Grilled Steak and Sides

Grilled steak is nothing original. I have my own go-to recipe here. Experimenting, though, with the grill and the skillet, I have developed an interesting approach to a couple of sides I think you'll love.
First, Broccoli Steaks are unusual, but delicious. Using the heat of your grill -- I have a charcoal grill that cannot justify only cooking a simple steak -- grill large hunks of broccoli until tender and smoky. Cut the stem off a head of broccoli and slice the head into large "steaks" of even thickness. Drizzle generously with olive oil and season with salt and pepper. The addition of fresh or dried herbs makes for a more complex flavor.
Grill similarly to your technique for steak. I like using direct heat for 4 minutes per side and then finishing with indirect heat for another 10 minutes or so.
The other side, which is hard to make out in the photo, is red wine braised mushrooms and onions.
Coarsely chop a pint of cremini mushrooms and a large onion. Saute in olive oil for 10 minutes until just starting to brown and add a half cup of red wine (I used a shiraz that had been opened a week earlier and had passed its prime). Season with salt and pepper and reduce until the wine is syrupy. Serve as a sauce or side to grilled steak and broccoli and you can hardly go wrong.

Easy Puff Pastry Tart

This tart is based on the free-form French pie technique known as "galette." Normally a galette is made with pate brisee, which is a standard pie crust. I use a sheet of store-bought puff pastry rolled out to the size of a baking sheet. It's incredibly easy to do and creates an impressive presentation that will wow your guests -- and you! I am sharing the recipe for an apple-blueberry tart flavored with cinnamon sugar. The opposite flavor profile, but equally delicious, would include dijon mustard, sliced turkey or ham, and a sprinkling of excellent gruyere cheese. Any and everything in between would be delicious.


Puff Pastry Tart
Serves 6
Prep Time: 10 minutes
Cook Time: 20 minutes
  • 1 sheet store bought puff pastry, rolled roughly to the size of a baking sheet
  • 2 granny smith apples, peeled, cored, and thinly sliced
  • 1/2 cup fresh blueberries, raspberries, or blackberries
  • 2 tbsp. white sugar
  • 1 tsp ground cinnamon
Pre-heat your oven to 425 degrees. Roll your puff pastry to roughly the size of your baking pan on a large sheet of parchment paper. Leaving a 1-inch border, arrange the apples neatly on the dough. Sprinkle over the berries. Dust with the cinnamon sugar.
Bake for 20 minutes or until the pastry is risen and the apples are soft. Allow to rest for 10 minutes, slice, and serve.

Friday, April 15, 2011

Tiny Cream Biscuits

There is a traditional recipe for cream biscuits, but I find that a whole biscuit is too much for a guest as a side bread at supper. Here, you can use a shot glass as your biscuit cutter and serve these small puffs of fatty pastry with accoutrements to your heart's content.

Tiny Cream Biscuits
Yield: About 20 biscuits
Prep Time: 5 minutes
Cook Time: 15 minutes
  • 1/2 stick unsalted butter, chilled and cubed
  • 2 tbsp. chilled vegetable shortening (recommended: Crisco baking sticks)
  • 1 tsp. sugar
  • 1 tsp. salt
  • 2 cups all purpose flour
  • 1/2 cup very cold heavy cream or half and half (please, use heavy cream...)
Pre-heat oven to 400 degrees. In the bowl of a food processor, pulse the flour, sugar, salt, and fat about 10 times... until the texture is that of a coarse meal. Gradually pulse in the cream until a ball of dough forms. Turn out on to a floured surface.

Roll the dough into a 1-inch thick layer and cut into small biscuits with a shot glass or roughly with a paring knife.

Lay in a single layer on a baking sheet and bake for 15 minutes until golden brown. Cool for 10 minutes and serve warm.

Spring Weekend Menu

In Baltimore, Spring has certainly sprung. The degree of her springing varies by the day, but I decided to capitalize on warm weather last weekend and throw a dinner party that would celebrate the new season. I decided to make fried chicken, which I thought I posted here early on, but did not, so that is included below. I made a few cold sides, as well.

Fried Chicken
Serves 10
Prep Time: 20 minutes
Inactive Prep Time: 8 hours
Cook Time: 1 hour (or so, depending on frying vessel)

  • 2 fryer chickens, cut up into pieces (drumsticks, thighs, wings, and breasts), breasts halves cut into halves or thirds, depending on size -- reserve the neck and back for stock.
    • You could use pre-cut chicken, but there is a risk that the pieces will be large and uneven. Give some thought to breaking down your own bird. It's a skill worth having and easily  learned via a quick Google search.
  • 3 tbsp. salt (divided into 2 tbsp. for the chicken / 1 tbsp. to season the flour)
  • 2 tbsp. black pepper (divided)
  • 2 tbsp. garlic powder (divided)
  • 2 tsp. cayenne pepper (divided)
  • 1 quart buttermilk
  • 1/4 cup siracha chili sauce (or other hot sauce of your choosing)
  •  4 cups all purpose flour, for breading (seasoned, see the divided spices above)
  • Oil for frying (quantity depends on frying vessel used)
There is not an absolutely right or wrong way to go about this process, but regardless of your frying vessel, the procedure starts the same. Dust the chicken pieces with the salt, pepper, garlic, and cayenne -- generously, the quantities above are merely advisory. Toss to coat and place in a large mixing bowl. Meanwhile, mix the hot sauce and buttermilk. Pour over the chicken, taking care not to wash the seasoning off the meat.

This is the fruit of your labor!
Store in the refrigerator for at least 2 hours, but 8-24 hours is just fine. The acidic buttermilk will tenderize the chicken and help the seasoning penetrate the meat.

When ready to fry, pre-heat your oven to 300 degrees and leave it be for a moment. Meanwhile, bread the chicken. I prefer using a large tupperware storage container filled with seasoned flour (described in the ingredients) and shake the chicken in batches. Sometimes you need more or less flour depending on how wet your chicken is. When shaken, the chicken should be coated completely with dry flour.

Here is where things get sticky. If you use an electric deep fryer, pre-heat it to 370 degrees and fry the chicken until golden brown. Start with the dark meat and move on to the white meat. Drain on a baker's cooling rack and keep in a warm oven until the rest of the chicken is cooked, repeating the process in batches. If you're using a dutch oven or cast iron frying pan, heat the oil to 370 and use the same process, but you'll likely need to turn the chicken. Only ever fill the pan less than half full with oil to avoid overflowing.

When the chicken is all cooked, serve from the warm oven.
Mediterranean Pasta Salad

I made small cream biscuits on the side with whipped butter and cucumber salad, Mediterranean pasta salad, and a fresh, vinegar-based coleslaw.


The cucumber salad could not have been simpler.
  •  1 large English cucumber
  • 1/2 red onion, very thinly sliced
  • 1/2 cup extra virgin olive oil
  • 1/4 cup plus 1 tbsp. white wine vinegar
  • 2 tsp kosher salt
  • 1 tsp coarsely ground black pepper
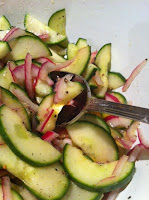
Cucumber Salad
You simply take one large English cucumber (the large variety, typically sold wrapped in plastic in the supermarket). Cut it in half lengthwise and spoon out the seeds, if desired. Slice the cucumber thinly. Slice a red onion very thinly. Toss with the oil, vinegar, salt, and pepper. Allow to rest in the refrigerator for 4-6 hours. Serve chilled.

The coleslaw is very similar. You simply take a head of savoy cabbage, remove the core, and shred thinly with a sharp knife. Toss with a half cup if white wine vinegar, a few tablespoons of excellent quality extra virgin olive oil, thinly sliced red onion, 4 grated carrots, salt, and coarsely ground pepper to taste. Chill for 24 hours. It couldn't be easier -- and is almost entirely calorie-free. 

That's how I chose to spend a Saturday evening! I hope that you'll find these ideas useful as you contemplate your Spring entertaining.


Monday, March 21, 2011

Caprese Skewers

Catering parties is a hobby that I've not recently indulged... until this weekend! Admittedly not original, this particular hors d'oeuvre is easy, no-cook, and absolutely fool proof. Enjoy!

Insalata Caprese on a Stick
Yield: 40 skewers
Prep Time: 30 minutes
  •  2 cups marinated bocconcini (recommended: Costco)
  • 200 or so large, fresh basil leaves
  • 2 pints grape or cherry tomatoes
  • 1/2 cup excellent quality olive oil
  • 1/3 cup excellent quality balsamic vinegar
  • 40 or so bamboo barbecue skewers
Assemble the skewers as pictured. Drizzle with oil and vinegar.
Much belated credit to sous chef Matthew Gray for assembling the skewers!

Cauliflower Gratin

I have long lauded the virtues of the humble cauliflower. I love the texture and rich savor flavor of this pale vegetable. It's not necessarily my favorite vegetable, but it certainly gets more attention from me than most of my foodie friends, it seems. I love cauliflower soup, roasted cauliflower, and the cauliflower gratin that I humbly present here. Its a simple process that I've repeated a couple of dozen times with the same result -- tender but firm cauliflower and a savory, crisp topping. Here, I deliberately omit the normally obligatory cream and cheese sauce. I think the cauliflower's complex taste deserves to shine, so I hope you'll give it a go without the added caloric luxuries.

Cauliflower Gratin
Serves 6
Prep Time: 10 minutes
Cook Time: 30 minutes
  • 1 large head cauliflower, cut into florets, stem diced
  • 1 cup grated gruyere or other quality Swiss cheese
  • 3 tbsp softened butter
  • 1/2 cup breadcrumbs (fresh are better, but dried will do)
  • 2 tsp salt
  • 1 tsp pepper
  • 1/8 tsp freshly ground nutmeg
  • 1 tbsp olive oil
The process is simple. Preheat the oven to 400 degrees. Toss the cauliflower with oil, salt, and pepper and place in an attractive baking dish. Roast for 20 minutes. Meanwhile, combine the grated cheese, nutmeg, butter, and breadcrumbs and form a coarse meal. After roasting, top the cauliflower with the breadcrumb and cheese mixture in an even layer and cook another 10 minutes until golden and crusty. The word gratin in French means crust, after all. You should find it crunchy, savory, and just a tad oozy with cheese.

Raw Sauces

As the weather warms, I am looking forward to trading in the gravy boat and sauce separator in favor of the food processor... to concoct raw sauces. I love to experiment with base greens and strong flavor variables to produce interesting and delicious pesto, persillade, pistou, and gremolata. Toying with various meats and pasta will create a new culinary canon for you. You'll find that there's almost no wrong pairing and that you don't need butter and stock to make a piece of chicken sing.

One night last week, I took a large, thin cut of sirloin and pan-seared it simply in olive oil. I topped it with what is technically a gremolata, or raw sauce of parsley, garlic, lemon zest, and olive oil. Here's how it went:

Simple Gremolata
Yield: 1 cup
Prep Time: 5 minutes
Cook Time: Read the title of the post, silly...
  • 1 cup parsley leaves
  • 1 large garlic clove, very roughly chopped, more if desired
  • 1 tsp salt
  • 1 tsp black pepper
  • 1/3 cup excellent quality extra virgin olive oil
  • 2 scallions
  • zest of 1 lemon
  • juice if 1/2 a lemon
In the bowl of a food processor fitted with a sharp steel blade, gently pulse every ingredient except the olive oil together about 10 times for about 2 seconds each. Adding the olive oil gently, pulse about 5-10 more times.

There are hundreds of variations you could try here... but this can get you started. Enjoy.

Tuesday, March 15, 2011

The Story of Leftover Takeout Rice

Last week, we tried to go out for pizza Iggy's, one of our favorite haunts in Baltimore. Our friends at the wine store (the restaurant is BYOB) reminded us that the restaurant is closed on Mondays. I was in no mood to cook. The solution? Chinese takeout. We've discovered a really good place that delivers quality "Chinese" food... the standard American fare but really exceeding expectations called Asian Harbor. There was a leftover pint of rice. Here's what I did with it...
Leftovers into Fried Rice
Serves 2 as a side, 1 as a lunch
Prep Time: 5 minutes
Cook Time: 10 minutes
  • 1 pint leftover steamed white rice
  • 1 tbsp vegetable oil
  • 1 small onion, finely diced
  • 1/2 cup carrots, medium diced
  • 1/2 cup frozen green peas
  • 2 tbsp soy sauce
  • 1/2 tsp siracha chili sauce (optional)
In a large non-stick skillet, cook the onion and carrots in oil until softened, but not browned. Add the rice and toss together with a non-metallic spoon or spatula (so as not to scratch your pan). If you can do the "chef toss" as in a wok, it is especially easy to combine the rice and vegetables. In fact, if you have a wok... use it here. Add the soy sauce and siracha sauce, if desired, and toss together until evenly combined and the rice is just starting to brown. Finally, add the peas, toss together, and cook for 2 or 3 minutes until the peas are just thawed.

This particular preparation is deliberately basic. You can augment the technique with scrambled egg, thawed shrimp or sliced chicken, or any other accoutrement of your choosing. I liked this preparation as a base for your creations. It also happens to be vegan, which is pleasant for some readers... and eaters!

Thursday, March 10, 2011

Coming soon...

Friends, my personal computer is currently in the shop for repairs so I am not able to dedicate the time to posting that I would normally. I have lost of great posts in the works, however, as soon as my computer is back. I am doing a one-time post from my work computer in order to keep y'alls interest... so check back early next week for chicken pot pie (with numerous variations), steak persillade, and an easy fruit tart that's guaranteed to please. Thanks for being so patient!

Monday, February 28, 2011

Winter Menu for 6

February is the time for hearty food and strong drink to sustain us through the final weeks of winter. It's unclear what Mother Nature's plan is for March -- I'm hoping for some warmth and sunshine -- but I wanted to share a recent dinner party menu in case you're in need of inspiration. It serves six easily, so four of us were very satisfied.

I started with a simple cheese board with aged Vermont White Cheddar, California Swiss, and a Vermont chĆØvre. I served toasted slices of my homemade focaccia bread. The mood called for cocktails, so I served whiskey sours. 


Whiskey Sour (Individual)
3 parts Bourbon or Tennessee Whiskey
1 part lemon juice
1 part simple syrup
Serve over ice


For the meal, I prepared braised short ribs of beef with mashed potatoes and roasted brussels sprouts.


Basic Roasted Brussels Sprouts
Serves 6
Prep Time: 10 minutes
Cook Time: 30 minutes

  • 2 lbs brussels sprouts, stem end trimmed, cut in half
  • 4 shallots, sliced (optional, be careful not to slice too thinly as they may burn)
  • 2 tsp. salt
  • 2 tsp. black pepper
  • 1 tsp. granulated garlic
  • 1/4 cup extra virgin olive oil
  • rimmed baking sheet lined with parchment paper

Pre-heat the oven to 450 degrees. In a large bowl, toss all the ingredients together until the sprouts are well-coated with oil. Spread on an even layer on the sheet pan and roast for 20-30 minutes until just starting to turn golden. Serve immediately.


Searing the short ribs before braising.
The star of this show is the braised short ribs. I strained the sauce this time in a fat separator and reduced it to a fine gravy thickened with just a little flour and butter in a beurre maniĆ© (kneaded butter).  


 With the right menu and a little planning, a delicious and hearty winter meal is easy. With roasting and braising, you're dealing with low-maintenance food and bold flavors.


Our guests brought sparkling Malbec and we enjoyed every drop. The bubbles really cut through the rich meat and potatoes perfectly. Great food and even greater friends can make you forget how cold it is outside.

Friday, February 25, 2011

Potato Leek Soup

This batch was just about perfect, y'all. I made a big pot last night for dinner and enjoyed a hot bowl during a rainy lunch today. I hope you'll try it.


Potato Leek Soup
Serves 6-8
Prep Time: 20 minutes
Cook Time: 30 - 45 minutes
  • 2 large Russet potatoes or 5 medium red bliss or Yukon gold potatoes, peeled and small diced
  • 6 cups chicken stock (vegetable stock will work, to make vegetarian)
  • 2 large leeks, cleaned and thinly sliced (only white and light green parts)
  • 2 tbsp olive oil
  • 4 cloves garlic, minced
  • salt and pepper to taste
In a large pot, heat the oil over a medium high flame until shimmering. Add the leeks and cook for 5-8 minutes until just softened. Add the potatoes and toss until combined and the potatoes are coated with oil. Add the garlic and cook until fragrant, but not burned, about 1 minute. Add the stock and bring to a simmer. Cook for 20 minutes, stirring often to prevent the potatoes from sticking to the bottom of the pot.  Puree with an immersion blender or in batches in a blender or food processor until completely smooth. Return to the pan. Taste for seasonings and add salt and pepper to taste. Bring to a low simmer and serve immediately.

Tuesday, February 22, 2011

Two Quick Soups for a Weeknight

It snowed last night and a dear friend was in the mood for soup. I shared these ideas with him and I thought you all may enjoy bundling up with a hot bowl of comfort before Spring finally arrives. Each soup will serve 4-6 people and take about 45 minutes from start to finish.


White Bean Soup with Turkey Sausage

2 cans cannellini or great northern beans
2 tbsp. olive oil
1 onion, finely diced
1 rib celery, finely diced
2 cloves garlic, minced
1 lb. turkey kielbasa (or regular kielbasa Polish sausage) thinly sliced or diced
4 cups chicken stock
1-2 tsp. fresh chopped thyme, to taste
1 bay leaf
salt and black pepper to taste

In a sauce pan or soup pot, saute the onion and celery in olive oil over medium high heat until softened. Add the garlic and stir until fragrant.

Add the kielbasa and saute until edges start to brown slightly.

Add the chicken stock and stir in the thyme and bay leaf. Drain and rinse the beans. Bring to a simmer and add the beans to the soup.

Simmer for 30 minutes uncovered. You can mash roughly to thicken or serve as is, removing the bay leaf.


Photo Courtesy Max Blachman, who was kind enough to make the white bean soup.


Simple Italian Tomato Soup

2 cans diced tomatoes
2 tbsp. olive oil
1 onion, finely diced
1 rib celery, finely diced
1 carrot, finely diced
2 cloves garlic, minced
1 cup red wine (Chianti, Pinot Noir, or anything you have on hand)
2 tbsp. tomato paste
3 cups chicken stock
1/2 tsp cayenne pepper
1 bay leaf
1 tsp dried oregano (or "Italian Seasoning" herb blend)
salt and pepper to taste.

In a sauce pan or soup pot, saute the onion, celery, and carrot in olive oil over medium high heat until softened. Add the garlic and tomato paste and stir until fragrant.

Add the red wine and simmer until the liquid is almost completely evaporated. Add the tomatoes, salt, pepper, cayenne, and herbs. Stir until the herbs begin to smell (called "blooming" the spices).

Add the chicken stock and simmer uncovered for 30 minutes. Can be served over large pasta or on its own with crusty bread.

Wednesday, February 16, 2011

A Special Note

I want to briefly address an item of interest for some of my readers, especially as my audience expands to groups that may have considerations of dietary laws and restrictions.
I have a deep and abiding respect for the Jewish tradition and the teachings of my faith with regard to consciousness of what we eat. While I am not shomer kashrut, or observant of the strictures of kosher laws, it's important for me to note that my authorship of menus and recipes in this publication are not intended to promote that choice. I write this blog to capture the memories of my mother's cooking, expand my own culinary frontiers, and help other home cooks prepare better food. For the home cooks who are Jewish, I certainly encourage you to learn about what our tradition teaches with respect to what we eat.
Please do not mistake this blog as a component of my professional or religious life. It's an archive of my journey through culinary arts, intended only to elevate food and its importance in our lives. I will continue to create wonderful food and share those experiences with you. Sometimes those meals will be Passover seders. Sometimes they will be clam bakes. I hope you'll enjoy reading about both.

Wednesday, January 26, 2011

Foolproof Chicken Wings

Chicken wings fried until crispy and drenched in Buffalo sauce are among my many guilty indulgences. These calorie-laden treats are especially popular finger foods at any sporting event, especially the Super Bowl. In a few weeks, we'll sit in front of our television and watch the Steelers battle the Packers. It goes without saying that I have to serve wings. I've tested a technique that lightens the calorie load significantly and is actually a ton easier than the multi-batch process of frying and saucing. Give this a try...

Oven Roasted Spicy Wings
Serves 6
Prep Time: 10 minutes (20 minutes if you split your own wings)
Cook Time: 1 hour
*Special Equipment* : Oven safe baking racks (2) (cooling rack) and 2 half sheet pans, lined with foil.

  • 2 dozen chicken wings or 4 dozen chicken wing parts (wing and drumette)
  • 1/4 cup olive oil
  • 1 tbsp. salt
  • 1 tbsp. baking powder
  • 1/2 tsp. - 1 tsp. cayenne pepper (to taste)
  • 1 tsp. black pepper
  • 2 tsp. garlic powder
  • 1 tsp. hot paprika
  • 1 tsp cider vinegar
Pre-heat a clean oven to 450 degrees. In a very large bowl, toss the chicken wings with the oil, vinegar, baking powder, and seasonings. Make sure the wings are coated evenly with everything. If you need to do this in batches if your bowl isn't large enough, that is better than having pockets of seasoning and pockets of naked wings.

Arrange the seasoned wings in a single layer on baking racks that are placed on foil-lined half sheet pans (rimmed baking sheet). When I tested the recipe, they all fit on my pans, but if they don't all fit on 2, just do several batches. They re-heat well.

Roast at 450 for 20 minutes, until the fat has rendered and they are crispy and browning well. Turn the oven down to 350 and roast another 30-40 minutes, until cooked through, golden brown, and crunchy. Serve hot or room temperature.

Tuesday, January 11, 2011

On Entertaining

I love to entertain. I don't know all the rules about forks and napkin folding, but I enjoy having friends over for a few laughs and plenty of delicious food. I often struggle, however, with my fondness for the formal and today's propensity for laid back dining and entertaining. As with all things, the key seems to be striking the right balance.
There are ways to maintain a structured dining experience without creating a stuffy atmosphere. Choice of menu can be quite homey, and served family style, but a set table with fine dishes and formal decor can strike a contrasting note. Nothing is more appealing than a simple beef stew served in a china bowl accompanied by a top tier red wine. On the other hand, very dainty food can be brought down from its lofty bone china rafters by serving with simple garnishes at a laid back potluck. My point is that the lines of formal home dining have become quite blurred. In these days of trendy cooking, many of the rules we once knew were flexible. The most important thing is to know your crowd; make your guests comfortable.
A gracious host will always, within reason, put the needs of his guests above his own. When you decide to throw a dinner party, make sure that there will be pleasant chemistry within the group. Accommodate your guests' diets and preferences. Incorporate their style with your own, allow them to bring something (wine, at least), and remember to have fun. Your friends will remember your company more than your menu, but that doesn't mean that the food doesn't matter.
Try something different from time to time. I'm the first one to bring out the classics for a holiday or Sunday supper, but why not throw the occasional curve ball?  A good example is making a batch of pizza dough and dividing up a number of toppings and letting everyone make their own pizza. Put a new twist on a family favorite, and don't be afraid of making something the night before. If you don't feel like making dessert, buy one, or skip it altogether and serve coffee after dinner. Ultimately, you can shape an experience for you and your guests that need not fit a traditional mold.
If you're afraid of making dinner, throw a cocktail party. Afraid of cocktails? Buy some appetizers and serve beer and wine. Just be yourself, give it your best shot, and the rest will take care of itself.

Monday, January 10, 2011

Brisket Braised with Beer and Onions

Brisket has become one of my favorite cuts of beef. I've posted one recipe already, but why not another? Along with short ribs, it's one of my go-to meats for braising. While it's traditional at any Jewish holiday or Friday night dinner, I have taken to preparing a brisket the evening before a weeknight dinner, as well. It feeds a crowd for just a dollar or  two per person and can sit for almost a week in the fridge. It's my idea of a dressed up pot roast. This version is a little off the beaten path, and much better made the night before... or even a few nights before.

Braised Brisket with Beer and Onions
Serves 8-10
Prep Time: 20 minutes
Cook Time: 4 hours, plus overnight to chill
  • 1 large brisket (5 - 7 lbs), trimmed of most fat
  • 2 large onions, peeled, halved, and sliced
  • 1 12 oz. bottle of stout or brown ale such as Guiness or Newcastle
  • 6 cloves garlic, smashed
  • 6 whole sprigs thyme
  • 2 cups beef stock
  • 1 tbsp tomato paste
  • salt and freshly cracked black pepper to taste
Allow the meat to come to room temperature, leaving out on a clean counter for 30 minutes to an hour. Preheat the oven to 300 degrees F.
Season the meat on all sides with the salt and pepper.
In a deep roasting pan (or large Pyrex style glass baking dish), add the stock, beer, thyme, garlic, and tomato paste.
Layer in the onions, creating a bed for the meat.
Place the meat on to of the onions and cover tightly with foil (or the lid to your dish).
Braise in the oven for 4 hours - until meat is completely tender.
Carefully remove the meat from the pan and set aside to cool.
Meanwhile, degrease the sauce and puree until smooth. Set aside.
Chill the brisket overnight.
Before serving, trim any remaining fat and slice to desired thickness. A very thin slice is customary, often cut with an electric knife. I use a traditional slicer.
Reheat the sliced brisket in the sauce until heated through -- usually around 30 minutes in a 350 degree oven covered, immersed in the sauce.
Serve with mashed potatoes, potato latkes, or even noodle kugel. Enjoy!